
YOUR FIRST STEPS
Keep every medical receipt.
Reimburse yourself whenever you choose.
HSA Assistant keeps the proof for your health savings account (HSA). Add the receipt for each medical bill you pay and confirm its details. The app keeps a running total of what you can reimburse yourself from your HSA, now or years from now. Your records stay encrypted on your iPhone.
Why keep your receipts?
An HSA can save you taxes three ways. Money goes in before tax. It can be invested, and its growth isn’t taxed. And it comes out tax-free when you use it for qualified medical expenses. These are the medical, dental and vision costs the IRS allows, such as doctor visits, prescriptions and glasses.
The Shoebox method. Pay medical bills yourself now, keep the receipts in your Shoebox, and leave your HSA invested. Later, even years later, you can reimburse yourself for those expenses, tax-free at any age. A reimbursement is money you take out of your HSA to cover a qualified medical expense you paid for yourself. In the meantime, the money in your HSA can grow.
The catch is proof. Under current IRS rules, there’s no deadline to reimburse yourself if the expense came after your HSA was opened, no one else (such as insurance) has repaid you, you haven’t deducted it on a tax return, and you keep the receipts. HSA Assistant keeps that proof for you.
Good to know. Investments can lose value, and nothing here is a promise of growth. Reimbursing yourself right away is fine too. California and New Jersey tax HSAs differently. This is general information, not tax advice. For details, see IRS Publication 969.
New to HSA Assistant?
Have the date your HSA was opened and a recent itemized medical receipt ready. You can add everything else as you go.
Get startedThis guide covers the iPhone test build. The app isn’t available to the public yet, and the wording on its screens may change before release. Every name, receipt and amount shown is made up.
Five terms you’ll see in the app
- Qualified medical expense
- A medical, dental or vision cost the IRS allows, such as a doctor visit, prescription or glasses. IRS Publication 502 lists what counts. You confirm it for each receipt. The app doesn’t decide for you.
- Reimbursement
- Taking money out of your HSA to cover a qualified medical expense you paid for yourself. You take the money out with your HSA provider, and the app records it.
- Shoebox
- Your confirmed receipts for expenses you paid out of pocket and haven’t been reimbursed for yet. The Shoebox method is to leave that money invested in your HSA and reimburse yourself later.
- Itemized receipt
- A receipt that shows the provider, the patient, the date of service, what it was for and the amount. A card slip or payment confirmation on its own isn’t enough.
- Contribution limit
- The most that can be contributed to your HSA for a year, including your employer’s contributions. It depends on who your health plan covers. From the year you turn 55, it’s $1,000 higher.
HSA Assistant is an organizing tool. It isn’t tax, legal or financial advice. It doesn’t connect to your HSA provider or bank, and it doesn’t move money. To check your own situation, see IRS Publication 969, or ask your HSA provider or a tax professional.
Find your way around
Five tabs run along the bottom of the screen:
- Overview shows the total Available to reimburse and the Reimburse button. Below them are your Shoebox, a summary of your records, your timeline and your last backup.
- Receipts lists your confirmed receipts by status, such as Available to reimburse or Paid from your HSA, and the reimbursements you’ve recorded.
- Contributions shows what you’ve contributed, what’s left under your contribution limit, and the tax summary.
- Add is where you scan a receipt or choose a photo or file. Receipts you haven’t confirmed yet wait here under To confirm.
- Settings holds the date your HSA was opened, your birth date, Timeline, Subscription, backups and help.
HSA Assistant follows your iPhone’s appearance setting (light or dark) and text size.
Getting started
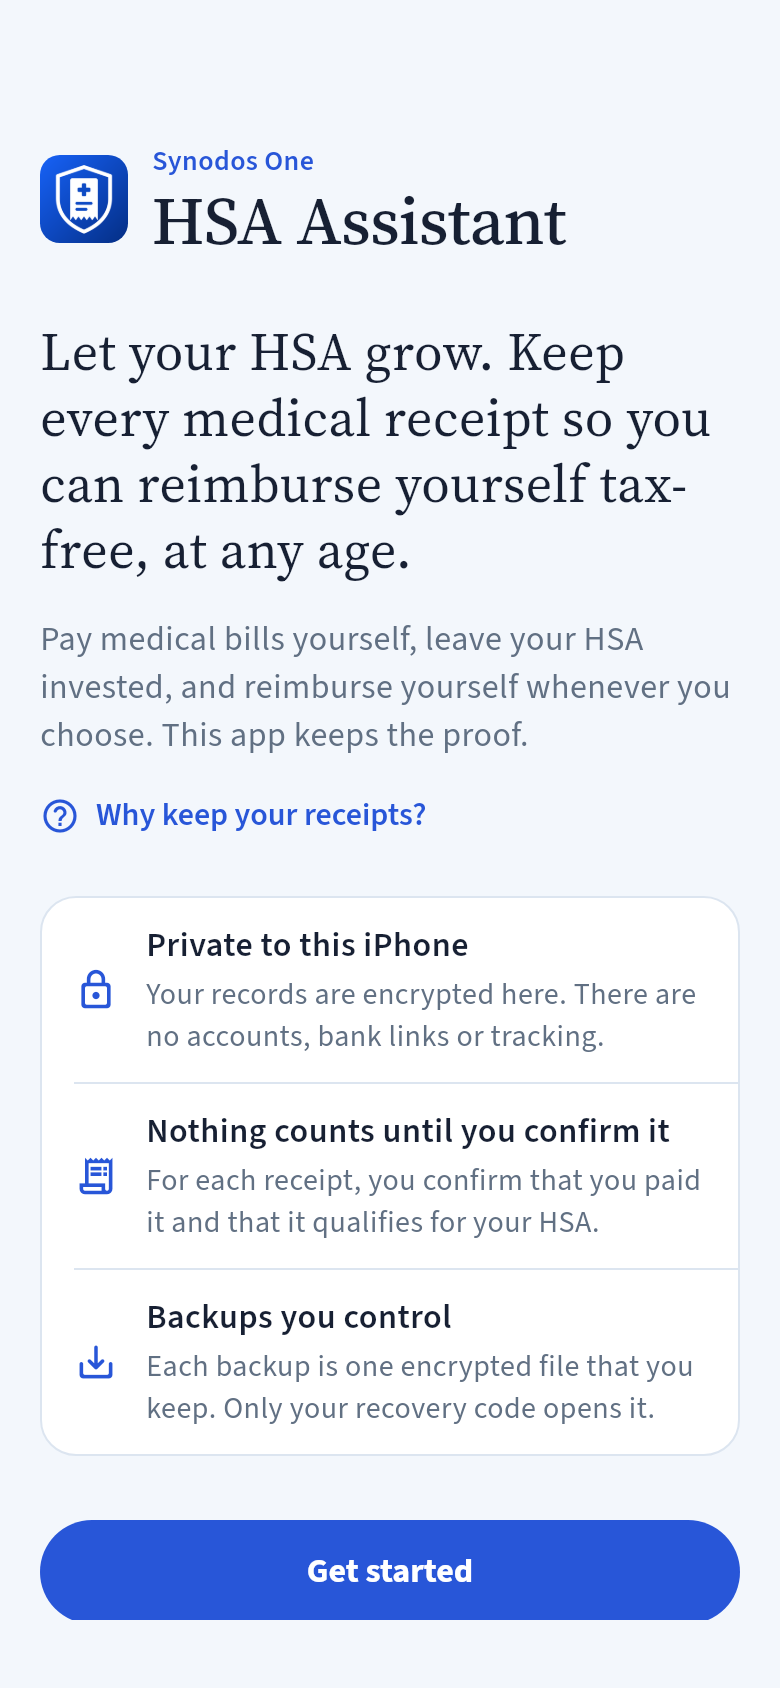
The first time you open the app, you see three promises: Private to this iPhone, Nothing counts until you confirm it and Backups you control.
- 1Tap Get started.
The app sets up your records, encrypted on this iPhone. If you have a backup from another iPhone, tap Restore from a backup instead. See Backups.
- 2Add the date your HSA was opened.
Overview asks for it first. Tap the message at the top, or go to Settings → Date your HSA was opened. Only expenses from that date on can be reimbursed.
- 3Add your birth date (optional).
Go to Settings → Your birth date. From the year you turn 55, your contribution limit includes an extra $1,000. Your birth date also sets the key dates on your Timeline.
Enlarge screenshot
Why the opening date matters
The IRS lets you use your HSA tax-free only for qualified medical expenses you have after your HSA was established. So the app doesn’t count a receipt whose date of service is before the date your HSA was opened. (IRS Publication 969, 2025 edition.)
Add a receipt
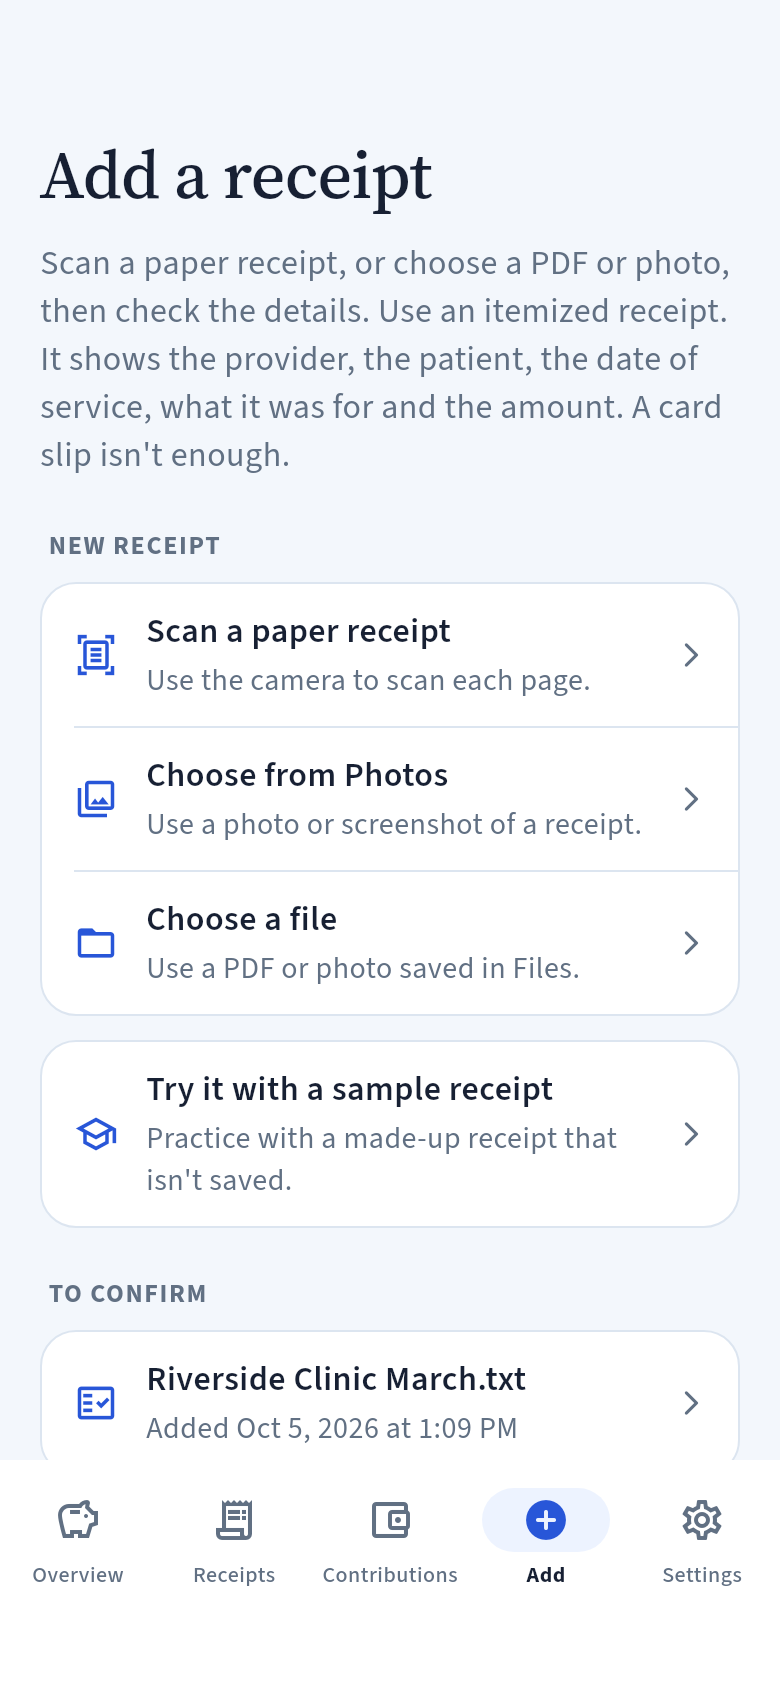
Open the Add tab and choose how to add the receipt:
- Scan a paper receipt uses the camera to scan each page.
- Choose from Photos adds a photo or screenshot of a receipt.
- Choose a file adds a PDF or photo saved in Files.
- Try it with a sample receipt lets you practice with a made-up receipt that isn’t saved.
Use an itemized receipt
An itemized receipt shows the provider, the patient, the date of service, what it was for and the amount. A card slip or payment confirmation isn’t enough, because it shows only that you paid, not what you paid for. If you don’t have an itemized receipt, your provider’s office or patient portal can usually give you one.
If the IRS asks, you must be able to show that the money you took out of your HSA paid for qualified medical expenses. An itemized receipt is that proof.
The app reads the receipt on this iPhone and fills in the details it finds. Nothing is sent anywhere. Next, you check those details (see Check a receipt).
Enlarge screenshot
New to the app? Start with Try it with a sample receipt. It walks you through every step without saving anything.
Check a receipt
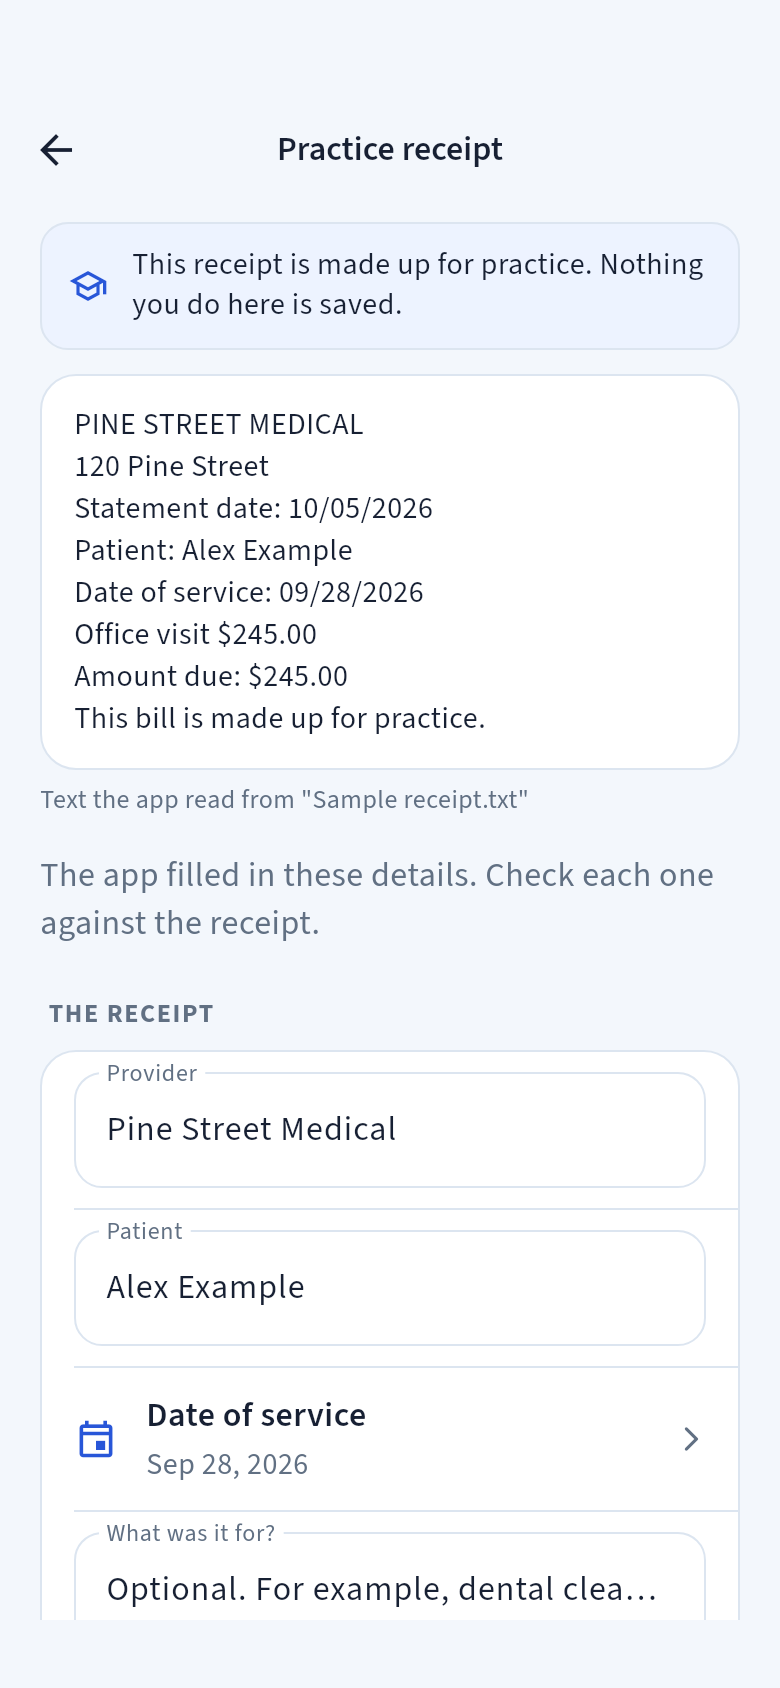
Nothing counts until you confirm it. The Check the receipt screen shows the receipt next to the details the app read from it.
- 1Check each detail against the receipt.
Provider is the doctor, dentist, pharmacy or clinic. Patient is the person it was for. Date of service is the date of the visit or purchase, not the statement date or the date you paid. Check the Amount too, and fix anything the app read wrong. What was it for? is optional, for example “Dental cleaning”.
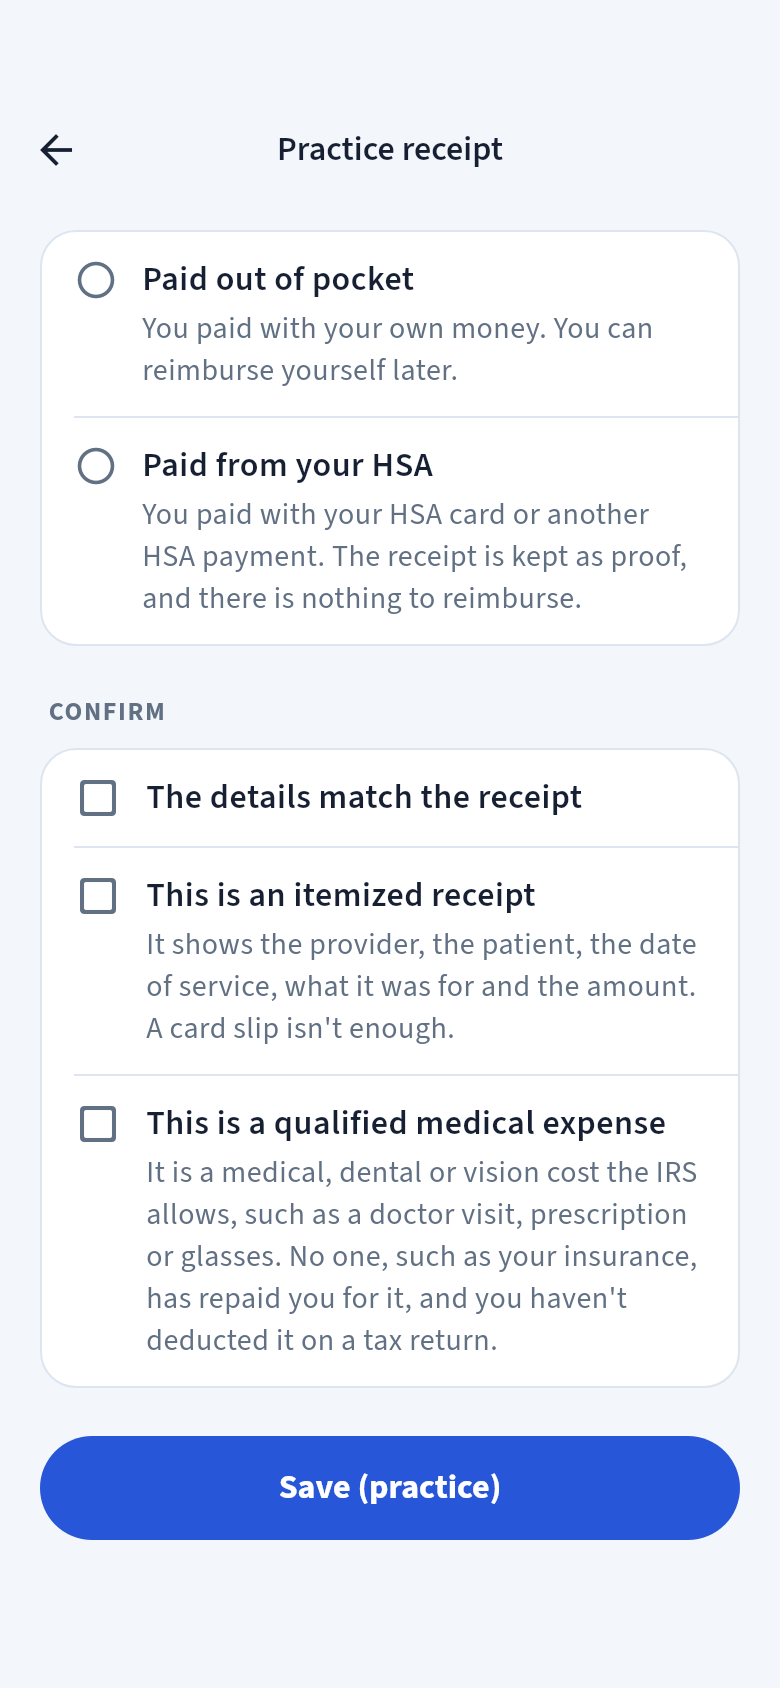
- 2Choose how you paid.
The app saves only expenses you’ve already paid. Choose Paid out of pocket if you paid with your own money. You can reimburse yourself later. Choose Paid from your HSA if you paid with your HSA card or another HSA payment. The receipt is kept as proof, and there is nothing to reimburse. Then add the Date paid.
- 3Select all three boxes under Confirm.
The details match the receipt means you checked each one. This is an itemized receipt means it shows the provider, the patient, the date of service, what it was for and the amount. This is a qualified medical expense means the IRS allows it, no one (such as your insurance) has repaid you for it, and you haven’t deducted it on a tax return.
- 4Tap Save receipt.
The app tells you what happens next, for example “Receipt saved. You can reimburse yourself for it.”
Enlarge screenshot
When an expense qualifies
IRS Publication 502 lists the medical expenses that qualify. The expense also can’t have been repaid by insurance or anyone else, or deducted on your tax return. You confirm this for each receipt, and the app keeps your answer with it. (IRS Publication 969, 2025 edition.)
Added a receipt by mistake? Tap Remove this receipt. The receipt and its saved copy are removed from this iPhone.
Enlarge screenshot
Reimburse yourself
Confirmed receipts you paid out of pocket add up under Available to reimburse on Overview. When you take money out of your HSA to cover them, record the reimbursement in the app. The app doesn’t move money. You do that with your HSA provider.
- 1Take the money out with your HSA provider.
Use your provider’s website or app, as you normally would.
- 2Tap Reimburse.
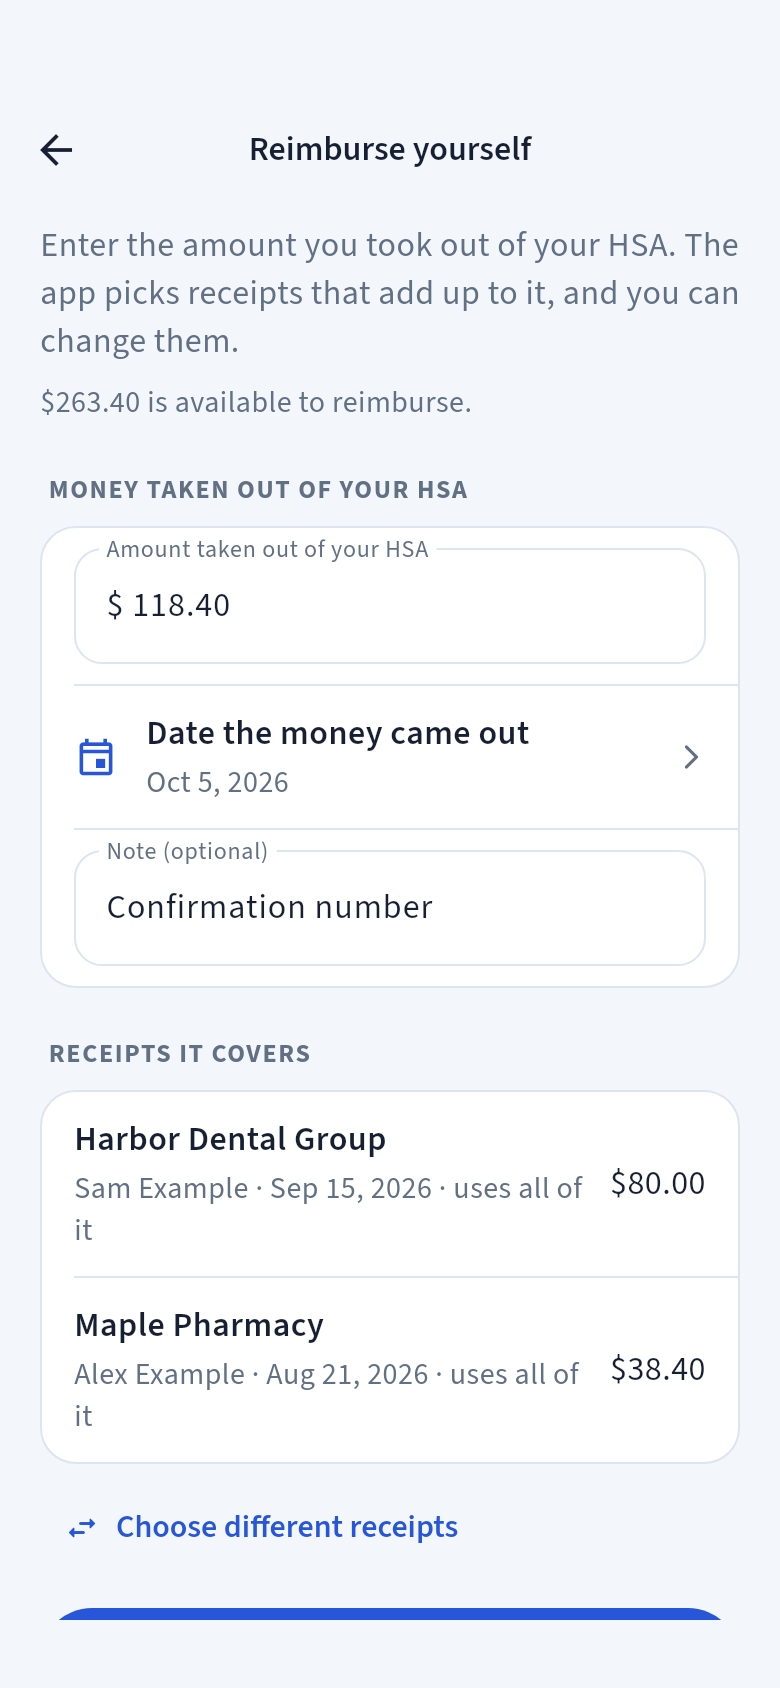
You’ll find it on Overview, on the Receipts tab and in Your Shoebox. Enter the Amount taken out of your HSA and the Date the money came out. You can add a Note (optional), such as a confirmation number.
- 3Check the receipts it covers.
The app picks receipts that add up to the amount. To use other receipts, tap Choose different receipts. If only part of a receipt is used, the rest stays available to reimburse later.
- 4Tap Save.
Receipts reimbursed in full move to Reimbursed on the Receipts tab, and the amount available to reimburse goes down.
Enlarge screenshot
Is there a deadline?
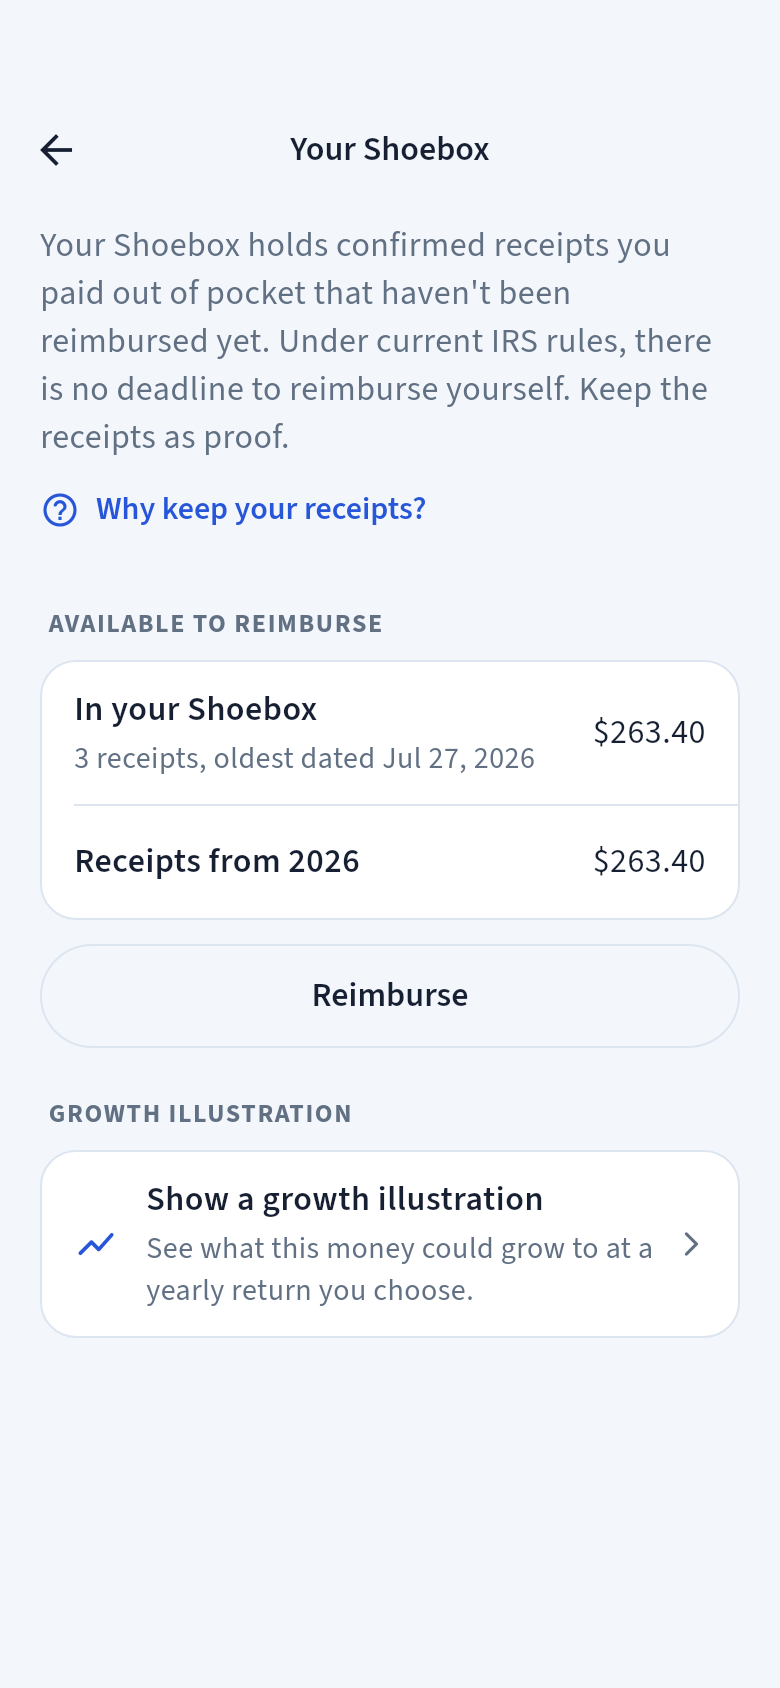
Under current IRS rules, no. You can reimburse yourself tax-free for qualified medical expenses you had after your HSA was established, as long as you keep records that prove it. That’s why the app keeps every receipt. (IRS Publication 969, 2025 edition: “You must keep records sufficient to show that the distributions were exclusively to pay or reimburse qualified medical expenses.”)
Your Shoebox on Overview shows what you can reimburse, year by year. Tap Show a growth illustration to see what that money could grow to if it stays invested and earns a yearly return you choose. It’s an illustration, not a forecast or advice. The app never suggests a rate.
Changed your mind? On the Receipts tab, open the reimbursement under Reimbursements. You can change the amount, the date or the receipts it covers, or tap Cancel this reimbursement. If you cancel it, the amount it covered is available to reimburse again.
Enlarge screenshot
Contributions and your contribution limit
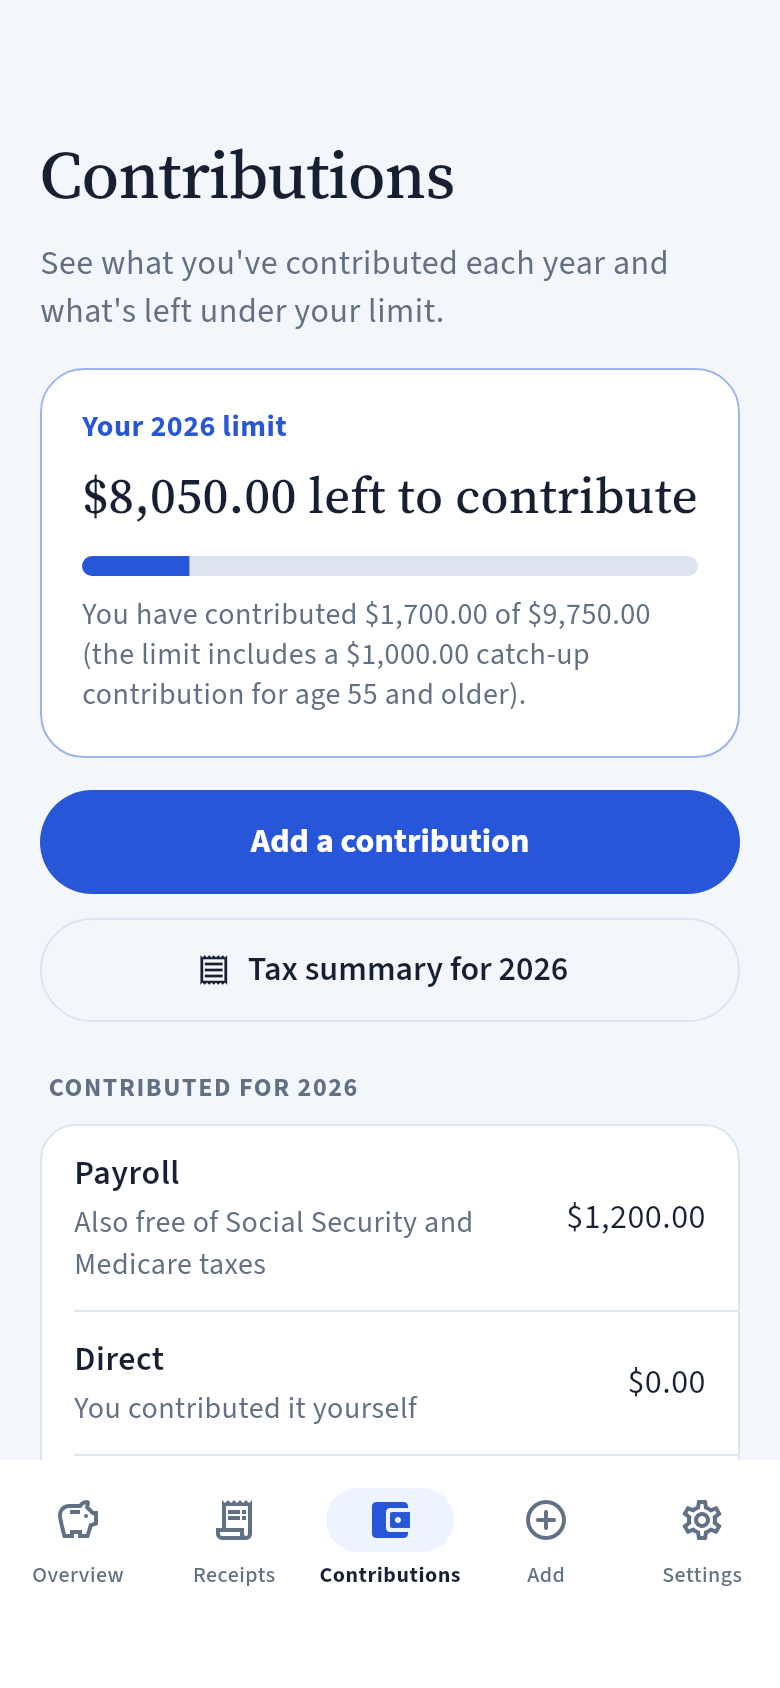
The Contributions tab shows what you’ve contributed this year and what’s left under your contribution limit. All contributions count toward the limit, including your employer’s.
- 1Add who your health plan covers.
Tap Health plan in 2026. Under Who does your health plan cover?, choose Just you, all year, You and at least one family member, all year, It changed during the year (then set the months for each) or No HSA-eligible plan, all year. The small print under each choice gives the IRS term, self-only or family coverage, as used on Form 8889.
- 2Tap Add a contribution.
Enter the Amount and the Date contributed. Under Where it came from, choose Payroll (taken from your paycheck before taxes), Direct (you contributed it yourself) or Employer (your employer contributed it).
- 3See what’s left.
The meter shows how much more you can contribute, for example “$8,050.00 left to contribute”. If you contribute more than the limit, the app tells you by how much. It doesn’t stop you.
Enlarge screenshot
IRS contribution limits
| Tax year | Just you (self-only coverage) | You and family (family coverage) | Extra from the year you turn 55 |
|---|---|---|---|
| 2025 | $4,300 | $8,550 | $1,000 |
| 2026 | $4,400 | $8,750 | $1,000 |
| 2027 | $4,500 | $9,000 | $1,000 |
Sources: IRS Publication 969 (2025), Rev. Proc. 2025-19 (2026 limits) and Rev. Proc. 2026-24 (2027 limits). Your limit depends on the months you had an HSA-eligible health plan. A month counts if you were covered on the first day of that month. Checked September 2026.
- Contributions for last year: You or your employer can usually still contribute directly for last year until the tax-filing deadline, usually April 15. A filing extension doesn’t change this deadline. Payroll contributions count for the year they’re paid. If the IRS postponed the deadline, for example after a disaster, you can record that when you add the contribution.
- Over the limit: The IRS generally charges a 6% tax for each year that excess contributions stay in your HSA. Your HSA provider can return the excess to you.
- Not tracked: The app doesn’t track the last-month rule or a family limit shared between spouses who each have an HSA, and it says so.
Add your birth date in Settings to see your Timeline. It shows the year your limit rises by $1,000 (the year you turn 55), the Medicare sign-up window and age 65. From 65, money you take out for anything other than qualified medical expenses no longer has the 20% additional tax, but you still pay income tax on it. Once Medicare starts, you can’t contribute for that month or any later month.
Tax summary
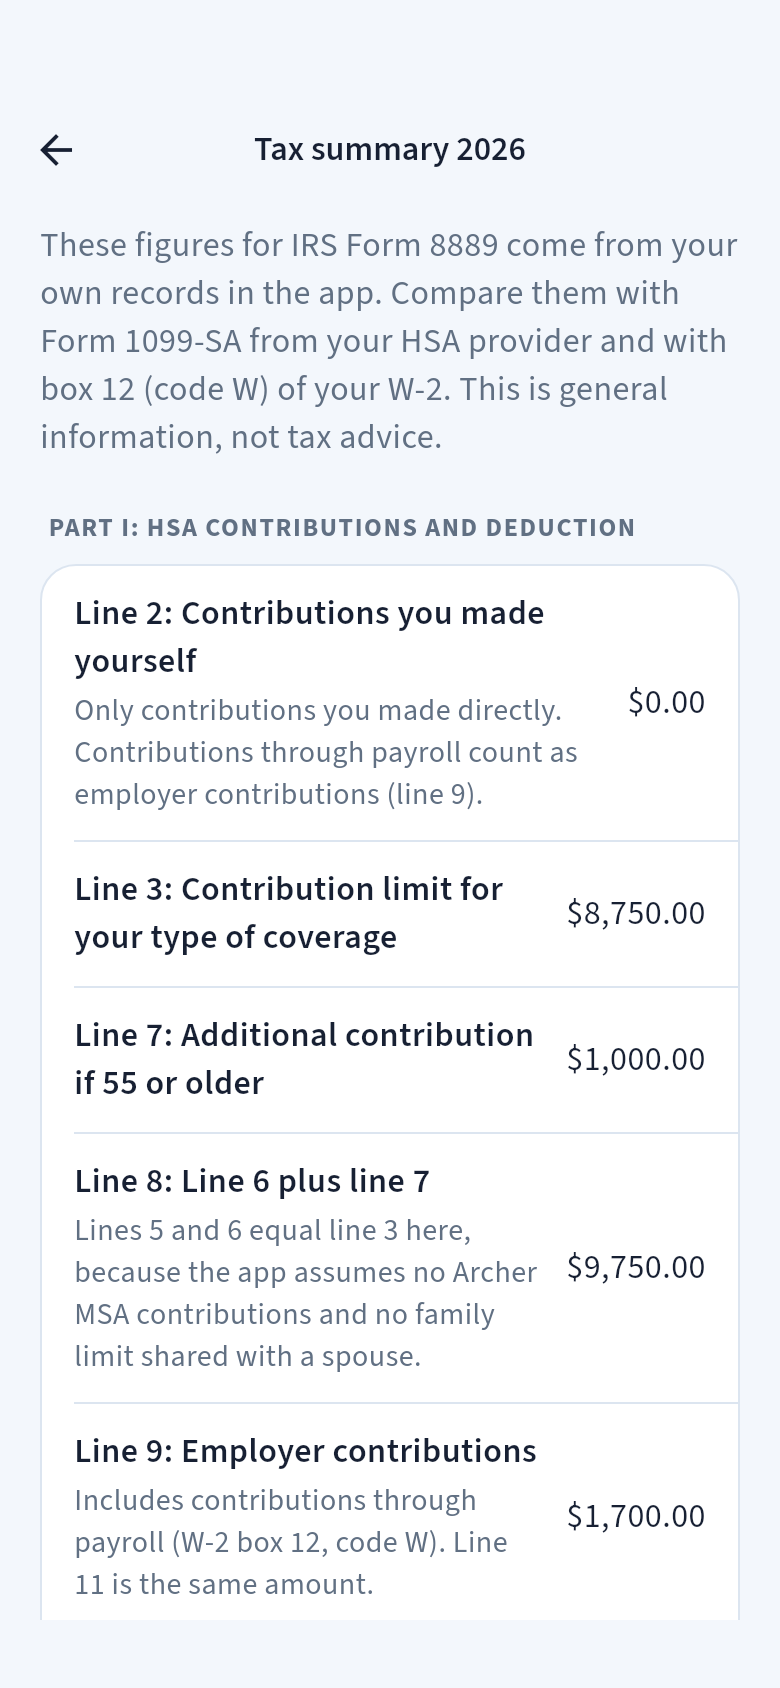
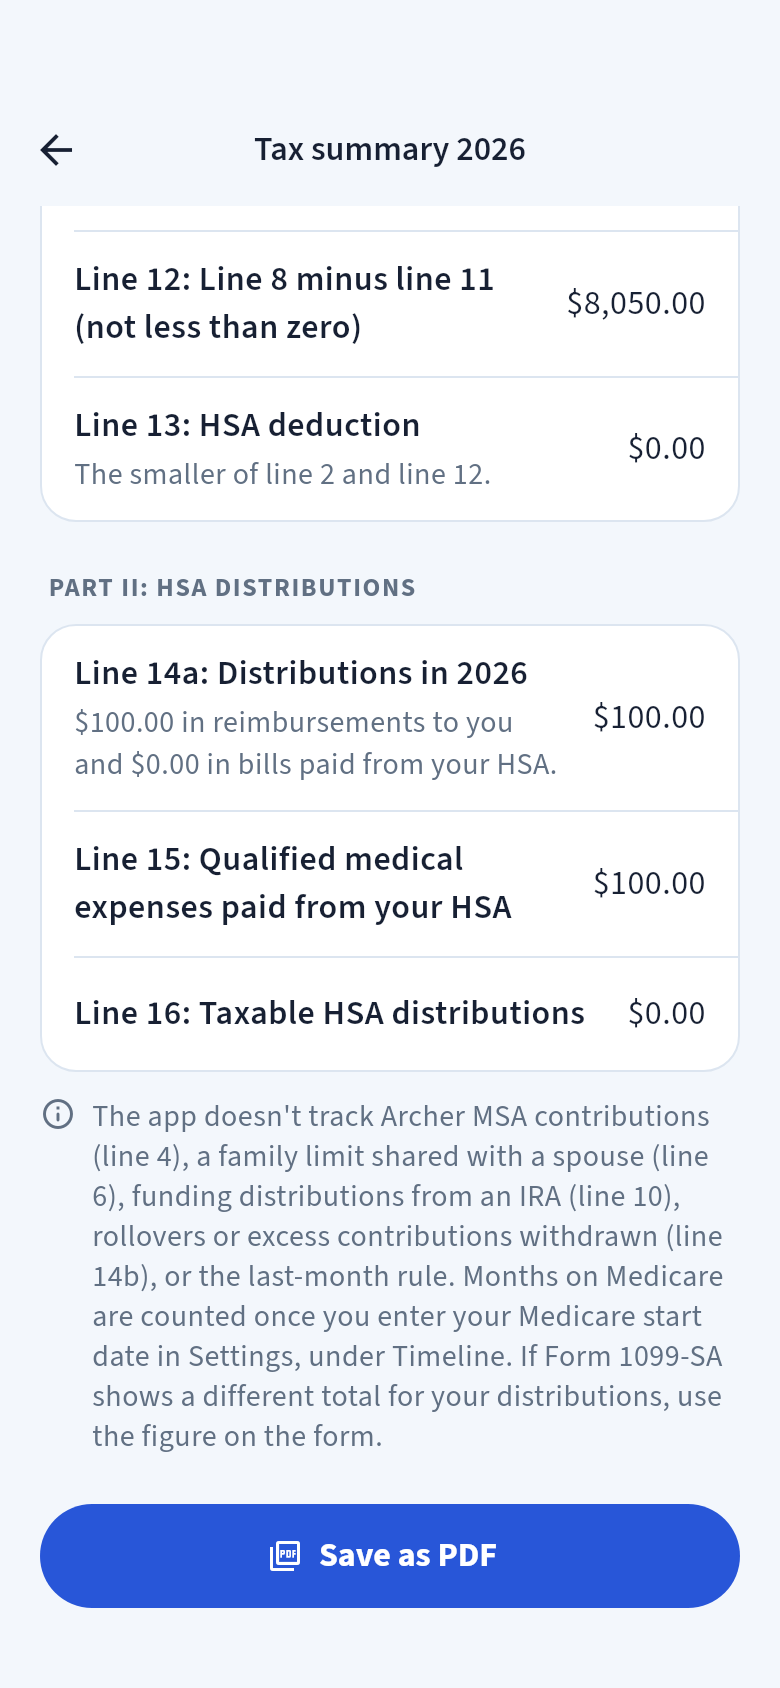
At tax time, the app gathers the year’s figures for IRS Form 8889, the HSA form you file with your tax return. The figures come from your own records in the app.
- 1Open Contributions, then tap Tax summary for 2026.
Each figure shows its Form 8889 line, for example Line 3: Contribution limit for your type of coverage and Line 14a: Distributions in 2026.
- 2Compare the figures with your tax forms.
Use Form 1099-SA from your HSA provider for the money taken out of your HSA, and box 12 (code W) of your W-2 for your payroll and employer contributions. If the figures differ, use the ones on the forms.
- 3Tap Save as PDF.
Choose where to save or send it, for example to your tax preparer. The PDF isn’t encrypted, so keep it somewhere private.
Enlarge screenshot
This isn’t tax advice
The summary is a starting point based on what you entered. The app doesn’t track Archer MSA contributions, a family limit shared with a spouse, funding distributions from an IRA, or the last-month rule, and it says so. Distributions dated close to the new year, and employer contributions made early in one year for the year before, can appear in a different year on your tax forms. The app points these out.
Line 16: Taxable HSA distributions shows money taken out of your HSA for expenses that don’t qualify, and lists the receipts involved. The IRS adds a 20% additional tax to that amount unless an exception applies, for example if you’re 65 or older or disabled, or if the distribution is made after the account holder’s death (IRS Publication 969, 2025 edition).
Enlarge screenshot
Backups
Your records are stored only on this iPhone. A backup is one encrypted file with all your records. Save it somewhere other than this iPhone, such as iCloud Drive or a computer. To restore it, you need the file and its recovery code.
Make a backup
- 1Open Settings, then tap Make a backup.
You can also tap Backup on Overview, then Make a backup.
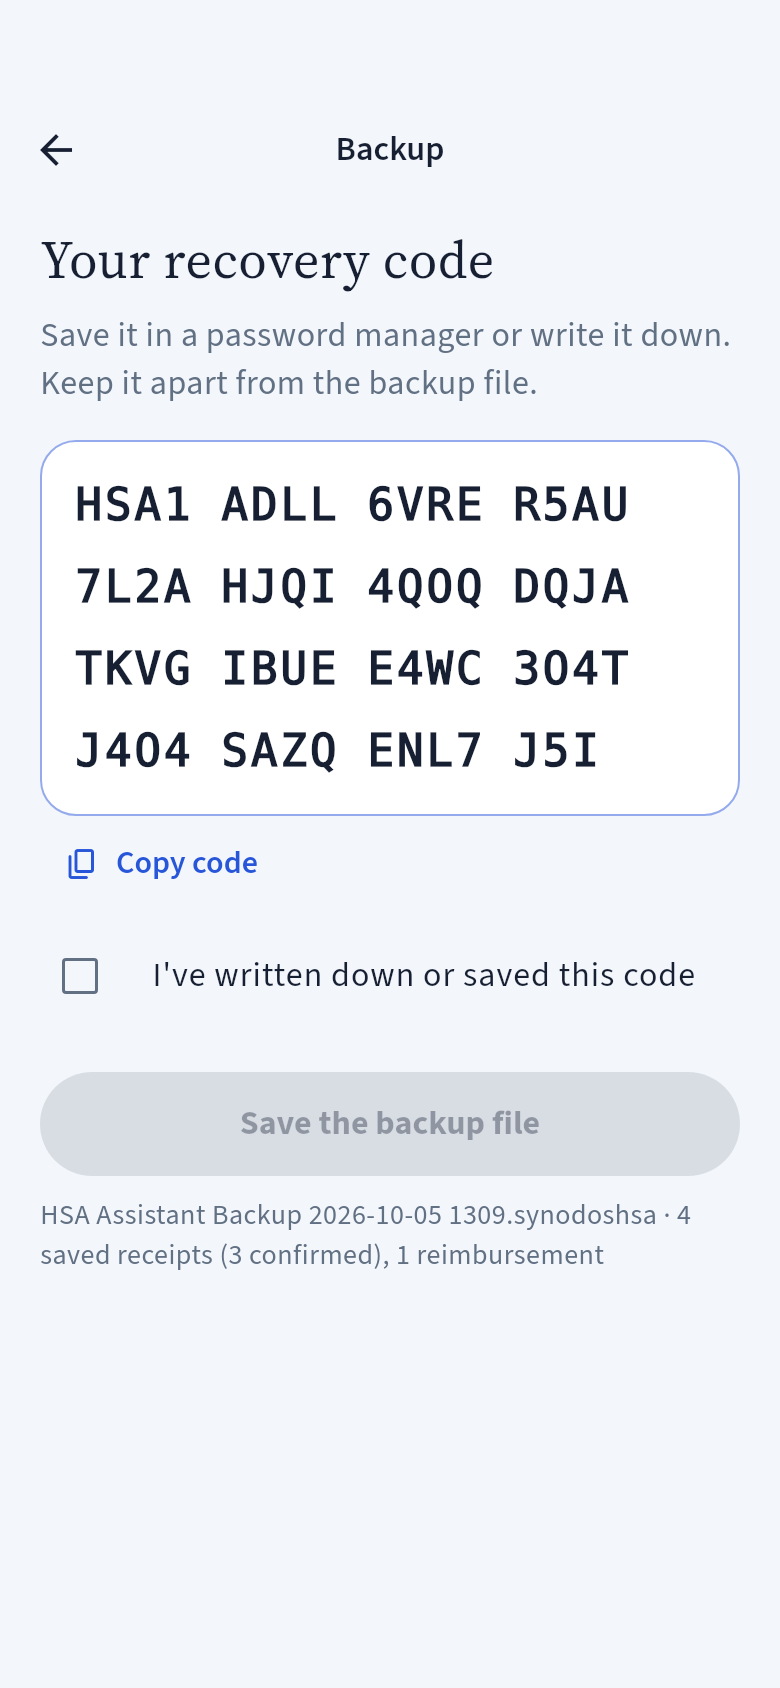
- 2Save your recovery code.
This code is shown only once. Without it, no one can open the backup. Save it in a password manager or write it down, then select I’ve written down or saved this code. Keep it apart from the backup file, as you would keep a key apart from the lockbox it opens.
- 3Tap Save the backup file.
Choose where to keep it. When it’s done, you’ll see Backup saved. If some entries are on hold, they won’t be in this backup. Back up again once they’re resolved.
Enlarge screenshot
Restore a backup
- 1On a new iPhone, or one with no records in the app, tap Restore from a backup.
It’s on the first screen, below Get started.
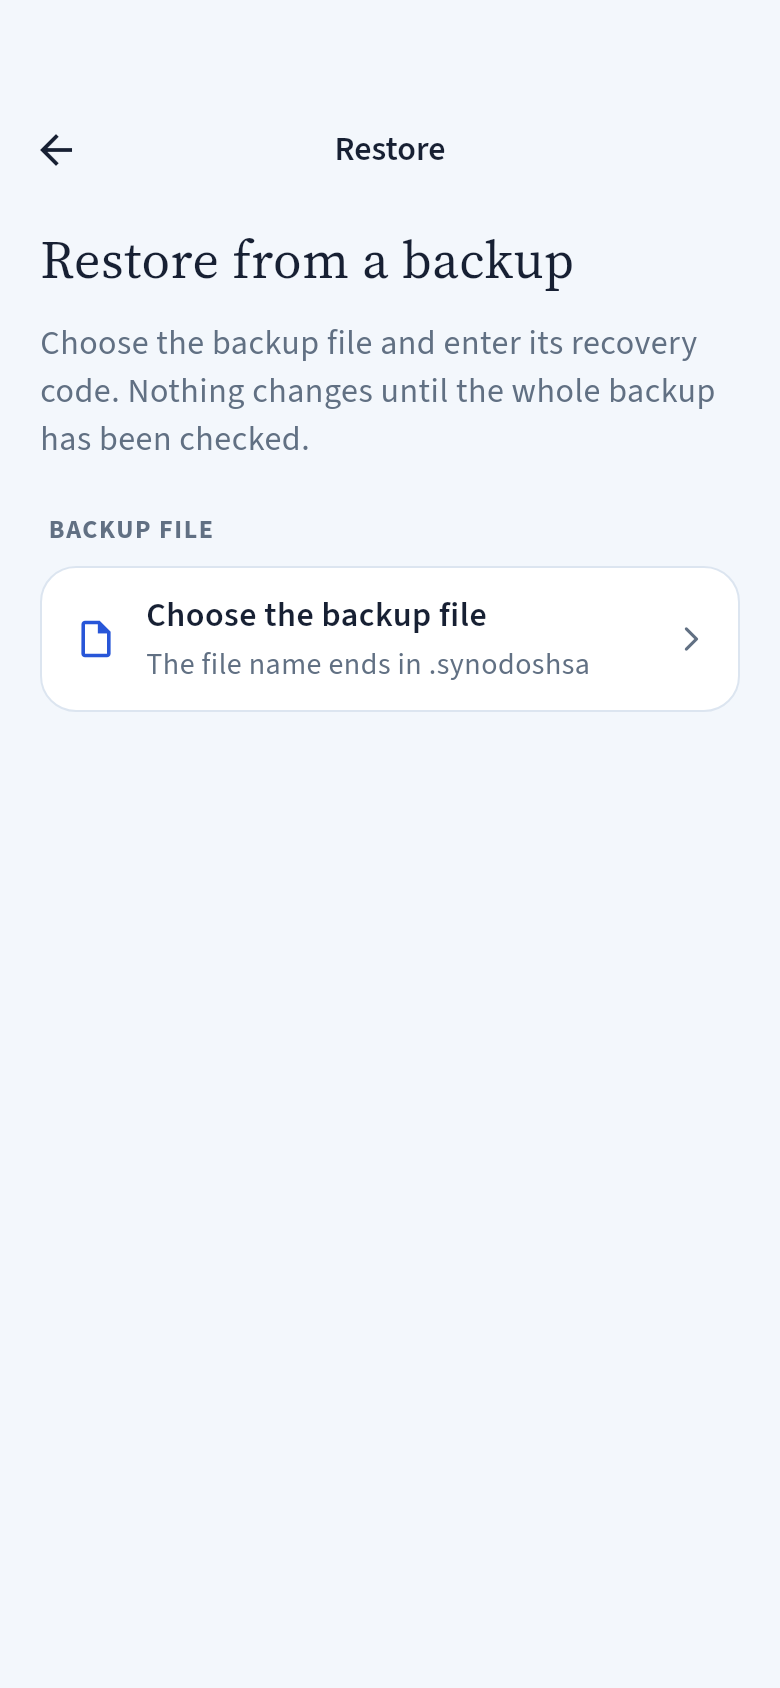
- 2Choose the backup file and enter the recovery code.
Tap Choose the backup file. The file name ends in .synodoshsa. Then enter the recovery code. It starts with HSA1.
- 3Tap Check and restore.
Nothing changes until the whole backup has been checked. When you see Your records are restored, tap Open my records.
Enlarge screenshot
Subscription and Family Sharing
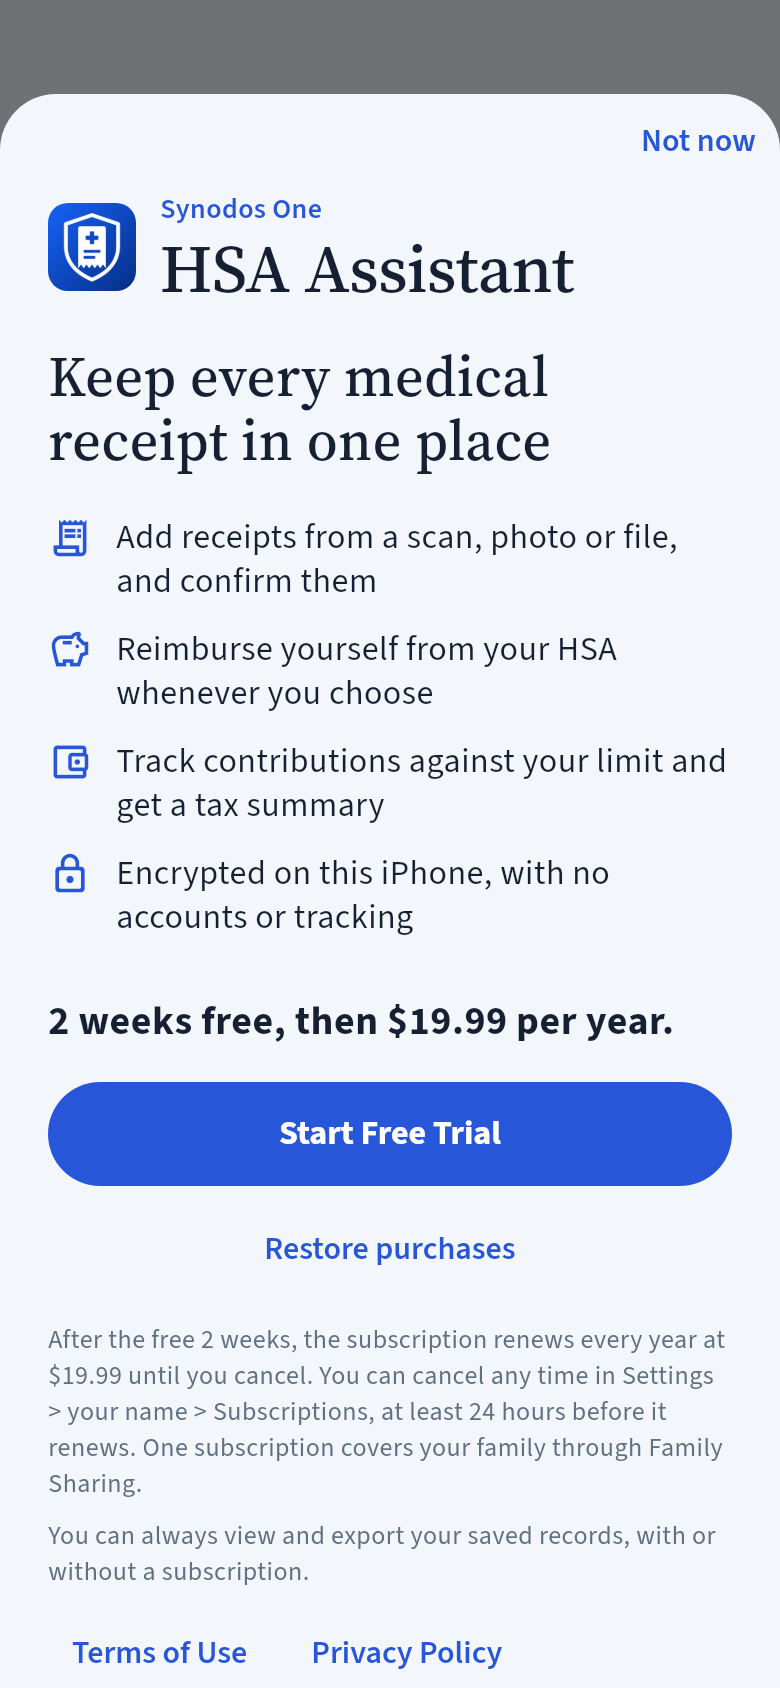
HSA Assistant is a yearly subscription through Apple: 2 weeks free, then $19.99 per year. It renews each year until you cancel. The app always shows the price before you subscribe.
- What needs a subscription: Adding new receipts, reimbursements and contributions. You never need one to correct details or change settings.
- If your subscription ends: You can still view and export everything you saved, including your receipts, the tax summary PDF and your backups.
- Family Sharing: One subscription covers your family through Apple Family Sharing.
- Manage or cancel: Go to Settings → Subscription → Manage subscription in the app, or to your name, then Subscriptions, in the iPhone Settings app. Cancel at least 24 hours before it renews. On a new iPhone, or to use a family member’s subscription, tap Restore purchases.
When you try something that needs a subscription, a sheet shows what’s included and the price. Tap Start Free Trial to continue with Apple, or tap Not now.
Enlarge screenshot
Privacy and help
Contact support
Go to Settings → Contact support. It opens an email to hsa-support@synodospath.com. The app doesn’t add your records to the email, so think carefully about what, if anything, you include.
Your records and privacy
Your receipts, records and settings are encrypted on this iPhone. There’s no Synodos account, no bank link, and no advertising, analytics or tracking. The app reads receipts on this iPhone, and nothing is sent anywhere. When you save a PDF, share a receipt or save a backup, the place you choose keeps that copy under its own privacy practices.
The app read a receipt wrong
Fix the details on Check the receipt before you save. Already saved? Open the receipt on the Receipts tab and tap Correct the details. What the app reads is only a suggestion. What counts is what you confirm.
A receipt doesn’t count
Check that its Date of service is on or after the date your HSA was opened, and that you confirmed it. Receipts under To confirm don’t count yet. Receipts paid from your HSA are kept as proof and never add to the amount available to reimburse. An older receipt listed under Not marked as paid counts once you open it and tap Mark as paid.
Your totals say “On hold” or “Needs your decision”
This can happen when two of your devices changed the same record before they synced, or when another device uses a newer version of the app. Follow the message on Overview. Nothing is lost. Anything you don’t keep is set aside, not deleted.
A backup won’t restore
Use the recovery code you saw when you made that backup. It starts with HSA1. No one can recover a lost code. You can restore a backup only when the app has no records yet.
Important limits
- The app isn’t tax, legal or financial advice, and it doesn’t decide whether an expense qualifies.
- It doesn’t connect to your HSA provider, bank or employer, and it doesn’t move money or file anything.
- Tax figures are a starting point. Compare them with Form 1099-SA, your W-2 and IRS Publication 969.
- Keep a recent backup in case you replace or lose your iPhone.
Sources
The tax rules and figures in this guide were checked in September 2026. They can change, and the IRS announces new limits each spring.
- IRS Publication 969 (2025), Health Savings Accounts and Other Tax-Favored Health Plans: irs.gov/publications/p969
- IRS Publication 502 (2025), Medical and Dental Expenses: irs.gov/publications/p502
- Rev. Proc. 2025-19, 2026 HSA limits: irs.gov/pub/irs-drop/rp-25-19.pdf
- Rev. Proc. 2026-24, 2027 HSA limits: irs.gov/pub/irs-drop/rp-26-24.pdf
- Instructions for Form 8889: irs.gov/forms-pubs/about-form-8889